🥯 Ultimate Bagel Recipe – How to Make Soft, Chewy, and Authentic Bagels at Home
When you crave that authentic New York bagel recipe, nothing beats the joy of baking your own at home. A homemade bagel recipe is surprisingly simple, and with the right techniques, you can get that perfectly chewy bagel recipe texture, a golden crust, and endless flavor options. Whether you want an easy bagel recipe for beginners, a healthy bagel recipe with whole wheat, or a cinnamon raisin bagel recipe for breakfast, this guide will walk you through everything step by step.
Ultimate Bagel Recipe
🥯 What Makes a Bagel Special?
Unlike other breads, a traditional bagel recipe involves boiling the dough before baking. This process creates that unique chewy interior and shiny crust that make New York style bagels so irresistible. Whether you’re making an everything bagel recipe, a sesame bagel recipe, or a plain bagel recipe, this boiling step is key.
Some people even love the no boil bagel recipe or bagel recipe without yeast for convenience, but if you want the authentic New York bagel recipe, boiling is non-negotiable.
🥯 Ingredients for Homemade Bagel Dough Recipe
For this bagel recipe from scratch, you’ll need:
4 cups bread flour (for chewy texture, but you can use all-purpose flour for a softer bagel recipe with all purpose flour)
This is the basic bagel dough recipe. Once you master it, you can branch out into whole wheat bagel recipe, sourdough bagel recipe, egg bagel recipe, or even gluten free bagel recipe if you prefer.
Ingredients for Homemade Bagel Dough Recipe
🥯 Step-by-Step Bagel Recipe
Step 1: Make the Dough
In a large bowl, mix the flour, salt, sugar, and yeast. Gradually add warm water and knead until you have a smooth, elastic dough. This is the base of a simple bagel recipe. If you’re making a quick and easy bagel recipe, you can reduce kneading time by using a stand mixer.
Step 2: First Rise
Cover the dough with a damp towel and let it rise for about 1 hour or until doubled in size. This step is the same whether you’re making a soft bagel recipe or a multigrain bagel recipe.
Step 3: Shape the Bagels
Punch down the dough and divide it into 8 equal pieces. Roll each piece into a ball and poke a hole in the center with your thumb. Stretch gently to form that classic bagel shape. For mini versions, try a mini bagel recipe by making 12–14 smaller balls instead.
Step 4: Boil the Bagels
Bring a large pot of water to a boil and add honey or malt syrup. Drop bagels into the water (2–3 at a time) and boil for about 1 minute per side. This gives you that authentic chewy texture found in bakery style bagel recipe versions.
Step 5: Add Toppings
After boiling, place bagels on a baking sheet lined with parchment paper. Sprinkle with sesame seeds, poppy seeds, or everything seasoning for savory bagel recipes. If you’re making a cinnamon raisin bagel recipe, you would have kneaded raisins and cinnamon into the dough earlier.
Step-by-Step Bagel Recipe
Step 6: Bake
Bake at 425°F (220°C) for 20–25 minutes until golden brown. You now have the best homemade bagel recipe ready to enjoy!
Ultimate Bagel Recipe
🥯 Variations of Bagel Recipes
Plain Bagel Recipe: Classic, soft, chewy – perfect for sandwiches.
Sesame Bagel Recipe: Nutty crunch that pairs perfectly with cream cheese.
Onion Bagel Recipe: Savory and aromatic.
Everything Bagel Recipe: A mix of sesame, poppy, garlic, onion, and salt.
Cinnamon Raisin Bagel Recipe: Sweet and chewy, ideal for breakfast.
Whole Wheat Bagel Recipe: Nutritious and fiber-rich, a healthy bagel recipe option.
Gluten Free Bagel Recipe: Perfect for those with dietary restrictions.
Vegan Bagel Recipe: Made without dairy or eggs, yet still fluffy.
Egg Bagel Recipe: Richer and slightly softer.
Sourdough Bagel Recipe: Tangy flavor with natural fermentation.
No matter which you choose, this best bagel recipe can be your base.
Bagel Sandwich Recipe: Stuff with eggs, cheese, and bacon for a filling meal.
Breakfast Bagel Recipe: Toasted bagel with cream cheese and jam.
Savory Bagel Recipe: Smoked salmon, cream cheese, capers, and dill.
Bagel Bread Recipe: Slice your homemade bagel to use as sandwich bread.
You can also use leftover bagels for bagel recipe ideas like bagel chips or mini pizza bagels.
🥯 Tips for the Perfect Bagel Recipe
Use bread flour for chewy bagels.
Don’t skip the boiling step – it’s what makes them authentic.
Experiment with flavors – from fluffy bagel recipe to multigrain bagel recipe.
Store bagels in an airtight bag and toast before eating for best results.
🥯 Nutrition Facts (per bagel, plain)
Calories: 270
Protein: 9g
Carbs: 55g
Fat: 1.5g
Fiber: 2g
Making a low calorie bagel recipe is possible by using whole wheat flour or reducing the portion size with a mini bagel recipe.
🥯 Interesting Facts
This homemade bagel recipe proves that you don’t need to live in New York to enjoy bakery-quality bagels. From the classic bagel recipe to flavored bagel recipes like cinnamon raisin or everything bagel recipe, the possibilities are endless. Whether you’re after an easy homemade bagel recipe for beginners or a perfect bagel recipe for special occasions, this step-by-step guide ensures success every time.
So grab your ingredients, try this authentic bagel recipe, and impress your family with warm, chewy bagels fresh out of the oven. Once you master this bagel recipe step by step, you’ll never go back to store-bought again.
Cauliflower Cheese Recipe – The Ultimate Comfort Food Classic
Few dishes evoke as much homely comfort as a well-made cauliflower cheese recipe. Rich, creamy, and irresistibly cheesy, this dish has been a beloved staple in British households for generations. Whether served as a cauliflower cheese side dish recipe alongside a hearty Sunday lunch cauliflower cheese recipe or enjoyed as a main course on its own, this classic is versatile, filling, and deeply satisfying.
In this article, we’ll walk you through how to make the best cauliflower cheese recipe, tips and tricks for getting that perfect creamy texture, and variations such as keto cauliflower cheese recipe, gluten free cauliflower cheese recipe, and even cauliflower cheese pasta recipe. From traditional cauliflower cheese recipe methods passed down for decades to easy cauliflower cheese recipe hacks for busy weeknights, you’ll find everything you need here.
Cauliflower Cheese Recipe – The Ultimate Comfort Food Classic
What is Cauliflower Cheese?
At its heart, cauliflower cheese is simply tender cauliflower florets baked in a rich, creamy cheese sauce. Think of it as a cheesy cauliflower gratin recipe, but with the unmistakable simplicity and heartiness of British cooking. It’s the ultimate cauliflower cheese recipe uk tradition – warming, comforting, and perfect for cold weather.
The classic cauliflower cheese recipe dates back to the 19th century, often accompanying roasts as a staple of English Sunday lunch. Over the years, it has evolved into countless variations – from cauliflower cheese recipe with breadcrumbs for added crunch, to cauliflower cheese casserole recipe perfect for large family gatherings.
Ingredients for the Best Cauliflower Cheese Recipe
Here’s a tried-and-tested homemade cauliflower cheese recipe that balances creamy richness with just the right amount of flavor.
Main Ingredients:
1 large head of cauliflower (cut into florets)
50g (about 3 tbsp) unsalted butter
50g (about 3 tbsp) plain flour (or gluten-free alternative for cauliflower cheese recipe gluten free)
500ml milk (whole milk for creaminess)
200g mature cheddar cheese (grated)
1 tsp English mustard (optional, for cauliflower cheese recipe with mustard)
Salt and black pepper to taste
Optional Add-ons:
50ml double cream (for a cauliflower cheese recipe with cream)
2 tbsp breadcrumbs for a crispy topping (cauliflower cheese recipe with breadcrumbs)
Nutmeg for a subtle warming flavor
Parmesan for extra cheesiness
This list can be adapted easily – for example, omit mustard and use almond flour instead of plain flour for a low carb cauliflower cheese recipe or a keto cauliflower cheese recipe.
Ingredients for the Best Cauliflower Cheese Recipe
Don’t Overcook the Cauliflower – Slightly undercooked florets hold up better in the oven.
Use Mature Cheddar – It gives the best ever cauliflower cheese recipe its signature flavor.
Add Double Cream – For a luxurious, creamy cheesy cauliflower recipe.
Bake in a Hot Oven – To get that crispy cauliflower cheese recipe topping.
Experiment with Cheese – Mix cheddar, Gruyere, or mozzarella for depth.
Why This Dish is So Loved
The homemade cauliflower cheese recipe is more than just food – it’s tradition. Generations have enjoyed cauliflower cheese recipe for roast, especially on Sunday lunch tables across the UK. Its simplicity makes it comforting, while its richness makes it indulgent.
For health-conscious eaters, healthy cauliflower cheese recipe adaptations ensure no one misses out – whether it’s gluten free cauliflower cheese recipe, vegetarian cauliflower cheese recipe, or low carb cauliflower cheese recipe.
Frequently Asked Questions
1. Can I make cauliflower cheese without an oven?
Yes, try a cauliflower cheese recipe without oven by preparing the sauce and serving it directly over steamed cauliflower.
2. What’s the best cheese for cauliflower cheese?
Cheddar is classic, but you can use Gruyere or Parmesan for variations like a cheesy cauliflower gratin recipe.
3. Can I freeze cauliflower cheese?
Yes! Freeze after baking and reheat in the oven for a quick make ahead cauliflower cheese recipe.
4. How can I make it healthier?
Try a healthy cauliflower cheese recipe by using low-fat milk, reducing cheese, and skipping the cream.
5. Is it vegetarian?
Yes, most versions are. Just ensure you’re using vegetarian-approved cheese for a proper vegetarian cauliflower cheese recipe.
Serving Ideas
As a cauliflower cheese side dish recipe with roasts.
With bread for a filling vegetarian dinner.
As a cauliflower cheese casserole recipe at potlucks.
Paired with soup for a cozy meal.
Interesting Facts
The cauliflower cheese recipe is a timeless classic – simple, satisfying, and endlessly adaptable. From easy homemade cauliflower cheese recipe to indulgent creamy cauliflower cheese recipe with cream, it’s a dish that deserves a place in every kitchen.
So whether you’re making a traditional cauliflower cheese recipe for a Sunday roast, trying out a keto cauliflower cheese recipe for a low-carb diet, or experimenting with a cauliflower cheese pasta recipe for a midweek dinner, this comforting classic will always deliver warmth and flavor.
Yorkshire Pudding Recipe – Crispy, Fluffy & Perfect Every Time
Few dishes capture the soul of traditional English cuisine as beautifully as the Yorkshire pudding recipe. Known for its crisp golden exterior and soft airy center, the perfect Yorkshire pudding is a must-have on the table for a Sunday roast. This dish has humble origins in Yorkshire, England, where home cooks discovered that a simple Yorkshire pudding batter recipe of eggs, flour, and milk could be transformed into a light and fluffy treat when baked in hot fat or beef drippings.
Today, homemade Yorkshire puddings are enjoyed around the world, not just as a side dish with roast beef but also as a versatile treat that can be paired with gravy, savory fillings, or even given a modern twist. In this guide, we’ll cover everything: from the history, step-by-step instructions, tips and tricks, to variations like vegetarian Yorkshire pudding recipe and Yorkshire pudding popovers.
Yorkshire Pudding Recipe – Crispy, Fluffy & Perfect Every Time
About Yorkshire Pudding
The beauty of this traditional Yorkshire pudding lies in its simplicity. With just a handful of pantry staples, you can create sky-high Yorkshire puddings that are crisp, golden, and hollow inside, perfect for soaking up rich Yorkshire pudding gravy.
Legend says it was originally served before the main meal to fill up diners inexpensively, saving the pricier cuts of meat for later. Today, though, the authentic Yorkshire pudding recipe has become an integral part of British culinary culture, especially when paired with a Sunday roast dinner.
Ingredients for Yorkshire Pudding Recipe
To make the best Yorkshire pudding recipe, you need simple ingredients:
1 cup (120g) all-purpose flour
1 cup (240ml) whole milk
3 large eggs
½ teaspoon salt
2–3 tablespoons beef drippings, lard, or vegetable oil
This easy Yorkshire pudding recipe can be doubled or halved depending on how many you need. For a vegetarian Yorkshire pudding recipe, replace beef drippings with vegetable oil or butter.
Ingredients for Yorkshire Pudding Recipe
Step by Step Yorkshire Pudding
Follow this step by step Yorkshire pudding guide to ensure the perfect rise:
Prepare the Batter In a mixing bowl, whisk together flour, salt, eggs, and milk until you get a smooth, lump-free batter. Rest the batter for at least 30 minutes (or up to overnight in the fridge). This is the secret behind the crispy Yorkshire pudding recipe.
Preheat the Oven & Tin Place a Yorkshire pudding tin recipe (or a muffin tin) in the oven at 220°C (425°F). Add a teaspoon of beef drippings or oil to each cup. Let it heat until sizzling hot.
Pour & Bake Carefully pour the batter into the hot tin. Bake immediately for 20–25 minutes without opening the oven door. The puddings will puff up and become golden brown.
Yorkshire Pudding
Serve Hot Enjoy your homemade Yorkshire puddings straight from the oven with roast beef, gravy, or even as Yorkshire pudding popovers filled with savory toppings.
Yorkshire Pudding Recipe – Crispy, Fluffy & Perfect Every Time
Tips and Tricks for No-Fail Yorkshire Pudding
If you’ve ever wondered why your puddings don’t rise, here are Yorkshire pudding tips and tricks to guarantee success:
Always use a very hot oven (220°C / 425°F).
Resting the batter is crucial – it helps with gluten relaxation and better puff.
Don’t open the oven while baking! That’s how you get the high rise Yorkshire pudding recipe.
Use beef drippings for the most authentic Yorkshire pudding recipe, but vegetable oil works too.
Serve immediately – they taste best when fresh and crisp.
Variations of Yorkshire Pudding
One of the joys of this dish is how versatile it can be. Here are some creative twists:
Yorkshire Pudding with Beef Drippings – The most traditional and flavorful way.
Vegetarian Yorkshire Pudding Recipe – Swap in vegetable oil or butter for vegetarians.
Yorkshire Pudding Muffin Tin – Make smaller, bite-sized puddings perfect for parties.
Yorkshire Pudding Popovers – Light, airy versions baked in popover tins, often served in the US.
Savory Yorkshire Pudding Recipe – Add herbs, cheese, or even bacon bits to the batter.
Yorkshire Pudding Gravy Recipe – Use the hollow center to hold rich beef gravy for a comforting dish.
Why You’ll Love This Homemade Yorkshire Pudding Recipe
Simple, pantry-friendly ingredients
Works for both authentic traditional Yorkshire pudding and modern variations
Pairs beautifully with Sunday roast beef or even vegetarian meals
Crisp outside, airy inside – the definition of the perfect Yorkshire pudding
Can be made in a Yorkshire pudding tin recipe or regular muffin tin
Common Mistakes to Avoid
Even seasoned cooks slip up with Yorkshire pudding. Here are pitfalls to watch out for:
Cold tins: Always preheat with oil before adding batter.
Too much batter: Fill cups only halfway.
Oven door peeking: Resist the urge, or they’ll collapse!
Skipping the rest: Batter should rest for at least 30 minutes.
These Yorkshire pudding tips and tricks make sure your puddings rise tall and stay crisp.
Serving Suggestions
Yorkshire pudding isn’t just for Sunday roast! Here are creative ways to enjoy it:
Classic pairing: Roast beef with Yorkshire pudding gravy recipe.
Fill with sausages for a “Toad in the Hole” dish.
Make Yorkshire pudding popovers and stuff them with scrambled eggs for brunch.
Try a dessert twist with cream and berries!
Healthier Alternatives
While the traditional recipe uses beef drippings, you can lighten it up:
Use sunflower or canola oil instead of dripping.
Try whole wheat flour for extra fiber.
Reduce portion size by making mini Yorkshire pudding muffin tin versions.
Even the healthy Yorkshire pudding recipe still delivers great taste.
Nutritional Value (per pudding)
Calories: ~120 kcal
Protein: 4g
Carbohydrates: 12g
Fat: 6g
Fiber: 0.5g
Interesting Facts
Making the best Yorkshire pudding recipe is less intimidating than it looks. With a hot oven, rested batter, and the right fat, you’ll master no-fail Yorkshire puddings that are crisp, golden, and delicious every time. Whether you’re sticking with the authentic Yorkshire pudding recipe with beef drippings, experimenting with a vegetarian Yorkshire pudding recipe, or serving modern Yorkshire pudding popovers, this dish is guaranteed to impress.
So, gather your flour, eggs, and milk, and whip up a tray of homemade Yorkshire puddings – perfect for any Sunday dinner or festive celebration.
If you’re searching for a light, refreshing, and elegant cocktail, look no further than the Hugo Spritz recipe. Originating from Northern Italy, this bubbly drink is now trending worldwide for its unique balance of floral elderflower liqueur, crisp prosecco, sparkling water, and fresh mint. Unlike heavier cocktails, the Hugo Spritz offers a alcohol-free, aromatic, and revitalizing experience perfect for summer evenings, brunch gatherings, or even a casual aperitivo.
The Hugo Spritz has become a rival to the famous Aperol Spritz, but instead of bitter-orange flavors, it brings in sweet, floral, and herbal notes. It’s not only delicious but also incredibly easy to make at home with just a few ingredients.
In this blog, we’ll walk you through the Hugo Spritz cocktail recipe, provide expert tips, share variations, discuss nutrition facts, and answer the most common FAQs about this trending Italian cocktail.
Hugo Spritz
🥂 Ingredients for Hugo Spritz Recipe
To make one serving of the Hugo Spritz cocktail, you will need:
4 oz (120 ml) chilled Prosecco (or any dry sparkling wine)
2 oz (60 ml) Elderflower liqueur (St-Germain is the most popular)
2 oz (60 ml) Sparkling water or soda water
Fresh mint leaves (6–8 leaves for garnish and muddling)
2–3 thin slices of lime (optional, adds a citrusy balance)
Ice cubes – enough to fill a large wine glass
👉 Pro tip: Always use chilled prosecco and soda water for maximum fizz and freshness.
Hugo Spritz Ingredients
🥄 Step-by-Step Instructions for Hugo Spritz Recipe
Step 1 – Prepare Your Glass
Choose a large wine glass or balloon glass. Fill it generously with ice cubes. This will keep the cocktail refreshingly cold while also creating a beautiful sparkling presentation. Using the right glass enhances the experience as it allows the mint and bubbles to release their aroma fully.
Step 2 – Add Fresh Mint
Lightly clap 6–8 mint leaves between your palms to release their essential oils before adding them to the glass. This simple trick intensifies the herbal aroma without the bitterness that comes from over-muddling. Mint is key in balancing the sweetness of the elderflower.
Step 3 – Pour in Elderflower Liqueur
Add 2 oz of elderflower liqueur (St-Germain or your favorite brand). This is the heart of the Hugo Spritz recipe – its floral sweetness defines the cocktail. Elderflower liqueur pairs perfectly with prosecco, adding a refreshing twist that makes this spritz different from its Aperol cousin.
Step 4 – Add the Sparkle
Slowly pour 4 oz of chilled prosecco into the glass. Let it mix naturally with the elderflower liqueur – avoid stirring too much at this stage to preserve the bubbles. The prosecco provides the crisp, bubbly foundation of the Hugo Spritz.
Step 5 – Balance with Soda Water
Hugo spritz recipe
Top the drink with 2 oz of sparkling water or soda water. This lightens the cocktail, making it less alcoholic and more refreshing – perfect for summer sipping. The ratio of prosecco to soda can be adjusted depending on how strong or light you prefer your spritz.
Step 6 – Add Garnish and Citrus
Finally, slide in a couple of thin lime slices and give the drink a gentle stir. The lime adds a slight tartness that cuts through the sweetness. Garnish with an extra sprig of mint for a fresh, elegant finish.
And there you have it – the perfect Hugo Spritz cocktail recipe in just a few minutes!
What Makes the Hugo Spritz Special?
Low alcohol content – perfect for daytime or long sipping sessions.
Floral & refreshing – elderflower brings a unique twist to traditional spritz cocktails.
Easy to customize – you can adjust sweetness, fizz, and garnish to taste.
Visually stunning – served in a wine glass with mint and lime, it looks as good as it tastes.
🍸 Tips for the Best Hugo Spritz Recipe
Always use quality prosecco – it’s the base of the cocktail.
Use fresh mint leaves, not dried, for maximum aroma.
Adjust elderflower liqueur if you prefer less sweetness.
Pre-chill your glass for an even crisper experience.
Make a pitcher version for parties – simply scale up the recipe.
🍹 Variations of Hugo Spritz
Hugo Rosé Spritz – Replace prosecco with sparkling rosé for a pink, fruity twist.
Citrus Hugo – Add orange slices or swap lime with lemon for a citrus boost.
Zero-Alcohol Hugo – Use non-alcoholic prosecco or sparkling grape juice with elderflower syrup.
Berry Hugo – Add muddled strawberries or raspberries for a fruity touch.
Serve Hugo Spritz with light appetizers like bruschetta, olives, cheese platters, or fresh salads.
Perfect for brunch, garden parties, beach outings, or aperitivo hour.
Pair with Italian classics like pizza margherita, pasta primavera, or seafood starters.
Hugo spritz recipe
Nutrition Facts (per serving, approx.)
Calories: 150–180
Carbohydrates: 12–15g
Sugars: 10–12g
Alcohol: 10–11% ABV
Fat: 0g
Protein: 0g
👉 Note: Values may vary depending on the brand of prosecco and elderflower liqueur used.
❓ FAQs About Hugo Spritz
Q1. What does Hugo Spritz taste like? It’s light, bubbly, and refreshing with floral elderflower sweetness, crisp prosecco, minty freshness, and a citrusy finish.
Q2. Can I make Hugo Spritz without alcohol? Yes! Use elderflower syrup instead of liqueur and non-alcoholic sparkling wine or soda.
Q3. What is the difference between Hugo Spritz and Aperol Spritz? The Aperol Spritz is bitter-orange based, while the Hugo Spritz is floral and minty. Both are Italian summer favorites.
Q4. Can I prepare Hugo Spritz in advance? It’s best made fresh to keep the fizz, but you can pre-mix prosecco and elderflower, then add soda and ice when serving.
Q5. Which liqueur is best for Hugo Spritz? St-Germain elderflower liqueur is the most popular choice, but other brands or elderflower syrup also work well.
Interesting Facts
The Hugo Spritz recipe is more than just a cocktail – it’s a refreshing celebration of Italian summer in a glass. With its balance of bubbles, floral sweetness, and herbal freshness, it’s perfect for any occasion, from sunny brunches to elegant evening gatherings. Whether you enjoy it in its classic form, a fruity variation, or as a mocktail, the Hugo Spritz is a drink that delights every palate.
So grab a glass, some mint, and a bottle of prosecco, and bring the taste of Italy into your home. Cheers! 🥂
Banana Stem Recipe – A Traditional & Healthy Indian Delicacy
The banana stem recipe (also called Vazhaithandu in Tamil, Arati Doota in Telugu, and Kele ka Thamba in Hindi) is a popular South Indian dish made from the tender inner stem of the banana plant. In Indian households, banana stem has been valued for centuries, not only for its earthy taste but also for its immense health benefits. It is rich in fiber, helps detoxify the body, and is considered excellent for kidney health.
Cooking with banana stem is an age-old tradition that beautifully combines nutrition with taste. Whether it is prepared as a stir-fry (Banana Stem Poriyal), curry, raita, or even juice, this ingredient is truly versatile. In this post, we will explore a detailed step-by-step recipe, along with health benefits, variations, serving tips, and FAQs.
Why Banana Stem is Special
High in dietary fiber – aids digestion and relieves constipation.
Great for kidney health – helps prevent kidney stones.
Detoxifying properties – flushes out toxins from the body.
Low calorie & diabetic-friendly – ideal for weight watchers.
Traditional Ayurvedic food – balances body heat.
This makes banana stem not just a food ingredient but also a natural medicine.
Ingredients for Banana Stem Recipe
Here’s what you’ll need to prepare Banana Stem Stir-Fry (Poriyal style) for 3–4 servings:
Banana stem (peeled & diced) – 2 cups
Oil – 2 tsp (preferably coconut oil)
Mustard seeds – 1 tsp
Urad dal – 1 tsp
Green chilies – 2, slit
Curry leaves – 6–8
Turmeric powder – ¼ tsp
Salt – as needed
Fresh grated coconut – 3 tbsp
Lemon juice – 1 tsp (optional, for freshness)
Step-by-Step Preparation (Detailed)
Step 1: Cleaning the Banana Stem
Peeling the banana stem properly is the most important step. Remove the outer layers until you reach the tender inner core. Slice it into thin rounds, and while cutting, you will notice fiber strands – roll them around your finger and discard. Immediately soak the cut pieces in buttermilk or water with lemon juice to prevent discoloration.
Step 2: Preparing for Cooking
Once soaked for about 10 minutes, chop the banana stem pieces into small cubes. Keep them immersed in water until you are ready to cook. This helps retain their freshness and crunchy texture.
Step 3: Tempering the Spices
In a kadhai (wok), heat 2 teaspoons of oil. Add mustard seeds and let them splutter. Next, add urad dal, curry leaves, and green chilies. Sauté for a minute until the dal turns golden and aromatic. This tempering gives the dish its authentic South Indian flavor.
Step 4: Cooking the Banana Stem
Drain the chopped banana stem cubes and add them to the tempering. Sprinkle turmeric powder and salt. Mix well, cover with a lid, and cook on medium heat for about 10–12 minutes. Stir occasionally to prevent sticking. The banana stem should turn tender yet retain a slight crunch.
Step 5: Finishing Touches
Once cooked, turn off the flame. Add freshly grated coconut and a squeeze of lemon juice for added freshness. Mix gently. Your Banana Stem Stir-Fry is ready to serve!
Serving Ideas
Pair it with steamed rice and sambar for a wholesome South Indian meal.
Serve alongside chapati or paratha for a fiber-rich side dish.
Enjoy with curd rice for a cooling and satisfying combination.
Add it as a side dish in a traditional thali for balance and nutrition.
Tips & Variations
Add moong dal: Cook banana stem with soaked moong dal for added protein.
Banana Stem Juice: Blend raw banana stem with buttermilk and a pinch of salt for a detox drink.
Banana Stem Curry: Instead of a stir-fry, cook it in a light coconut-based gravy.
Keep it fresh: Always soak cut pieces in buttermilk to prevent oxidation.
Spice level: Adjust green chilies based on your taste preference.
Nutritional Value (Per Serving)
Calories: ~90 kcal
Carbohydrates: 15 g
Protein: 2 g
Fiber: 6 g
Fat: 2 g
Rich in Potassium, Vitamin B6, and Iron
This makes banana stem one of the healthiest and most weight-loss-friendly vegetables you can include in your diet.
Q1: What does banana stem taste like? Banana stem has a mild, earthy, and slightly tangy taste with a crunchy texture, similar to celery.
Q2: Can banana stem be eaten raw? Yes, banana stem juice and raw banana stem salad are popular in Ayurveda for detox and kidney health.
Q3: Is banana stem good for weight loss? Absolutely! It is low in calories, high in fiber, and keeps you full for longer.
Q4: How to remove fibers while chopping? Twirl the fiber strands around your finger as you slice; this helps separate and discard them easily.
Q5: Can I make banana stem curry instead of stir-fry? Yes, you can cook it with coconut milk, tamarind, or dal for a delicious curry variation.
Interesting Facts
The Banana Stem Recipe is a classic example of how Indian cooking transforms humble ingredients into superfoods. This dish is healthy, detoxifying, and easy to prepare while staying true to traditional flavors. Whether you try it as a stir-fry, curry, or juice, incorporating banana stem into your diet is a wonderful way to stay fit and enjoy authentic Indian cuisine.
Gulgule is one of the most loved traditional Indian sweets, especially popular in North India. These soft, fluffy, and slightly crispy fried balls are made using wheat flour, jaggery (or sugar), fennel seeds, and ghee. Gulgule is not just a sweet snack; it carries cultural importance and is often prepared during festivals, puja ceremonies, and auspicious occasions. In many Indian households, Gulgule are offered to deities before being served as prasad.
Unlike heavy desserts, this simple recipe requires just a handful of ingredients, yet the taste is comforting and nostalgic. Whether you’re making it for evening tea, festive offerings, or a quick sweet craving, this Gulgule recipe will become a family favorite.
Ingredients for Gulgule Recipe
1 cup wheat flour (atta)
½ cup jaggery (grated or powdered) OR ½ cup sugar
1 tbsp fennel seeds (saunf)
1 tsp cardamom powder (optional)
A pinch of baking soda (optional, for softness)
½ cup water (adjust as needed)
Ghee or oil – for deep frying
Special About Gulgule
Traditional Indian sweet with deep cultural roots.
Prepared with easily available ingredients at home.
Healthier than many sweets since it’s made with wheat flour.
Can be served as a tea-time snack, prasad, or dessert.
Flavored with fennel and jaggery, giving it a rustic, earthy taste.
Step-by-Step Method (Detailed)
Step 1: Preparing the Jaggery Syrup
Take ½ cup jaggery and dissolve it in warm water. Strain it to remove impurities. This gives a natural sweetness and earthy flavor to the batter. If you’re using sugar, dissolve it in water as well.
Step 2: Making the Batter
In a mixing bowl, add wheat flour, fennel seeds, cardamom powder, and a pinch of baking soda. Slowly add the jaggery water and whisk into a smooth, lump-free batter. The consistency should be slightly thick but pourable.
Step 3: Heating Oil or Ghee
Heat ghee (preferred for authentic taste) or oil in a deep frying pan. Ensure it’s medium hot – if it’s too hot, the gulgule will brown quickly but remain uncooked inside.
Step 4: Frying the Gulgule
Take small portions of batter with your fingers or a spoon and drop them carefully into the hot ghee. Fry 6–8 pieces at a time, depending on the size of your pan. Fry on medium heat until golden brown and crisp from outside but soft inside.
Screenshot
Step 5: Serving
Drain on tissue paper to remove excess oil. Serve hot with chai, or let them cool slightly if offering as prasad. These gulgule taste best when fresh but can also be stored in an airtight container for 1–2 days.
Use jaggery instead of sugar for a more authentic taste.
Add grated coconut or sesame seeds for extra flavor.
For kids, drizzle with honey or sprinkle powdered sugar before serving.
If you prefer softer gulgule, increase jaggery water slightly.
Can be made during Navratri, Diwali, Karva Chauth, or simply as a tea snack.
Nutrition (Approx per serving of 3 gulgule)
Calories: 180 kcal
Carbohydrates: 30 g
Protein: 3 g
Fat: 6 g
Fiber: 2 g
Serving Ideas
Serve hot gulgule with masala chai in the evening.
Offer as prasad during pooja with fruits and other sweets.
Pair with curd or rabri for a dessert twist.
Perfect for festive thali or small family gatherings.
FAQs on Gulgule Recipe
Q1. Can I make gulgule without jaggery? Yes, you can replace jaggery with sugar, though the flavor will be slightly different. Jaggery gives an earthy sweetness.
Q2. Why did my gulgule turn hard? The oil may have been too hot, or the batter too thick. Fry on medium heat with smooth batter.
Q3. Can I bake gulgule instead of frying? Traditionally, they’re deep-fried, but you can bake them at 180°C for 20–25 minutes for a healthier version.
Q4. How long can I store gulgule? They are best fresh but can be stored for 1–2 days in an airtight box.
20 Best Pasta Recipes – Red Sauce, White Sauce, Pink Sauce, Italian & Indianised Pasta Recipes You’ll Love
If you’re a pasta lover, this blog is your ultimate guide to 20 best pasta recipes – from the classic red sauce pasta recipe, pink sauce pasta recipe, and white sauce pasta recipe Italian style to delicious arrabiata pasta recipe, pesto pasta recipe, and spaghetti pasta recipe. We’ve included everything – penne pasta recipes, macaroni pasta recipe, fusilli pasta recipe, and even chicken pasta recipes for non-veg fans. For desi foodies, you’ll find flavorful Indian pasta recipes and fun Indianised pasta recipes that bring a local twist to Italian classics. Whether you’re searching for a pasta recipe in Hindi, looking for quick vegetarian pasta recipes, or craving authentic Italian pasta recipes, this blog has something for everyone. Perfect for lunch, dinner, kids’ tiffin, or even a cozy weekend treat – these pasta dishes are quick, easy, and bursting with flavor.
1. Arrabiata Pasta Recipe
🥗 Ingredients
2 cups penne pasta
2 tbsp olive oil
4–5 garlic cloves (sliced)
2 cups tomato puree
1 tsp chili flakes
½ tsp oregano
Salt & black pepper to taste
Fresh parsley for garnish
Arrabiata Pasta
👩🍳 Method
Cook penne pasta in salted water until al dente. Drain and set aside.
Heat olive oil in a pan, sauté sliced garlic until golden.
Add tomato puree, chili flakes, oregano, salt, and pepper.
Cook until the sauce thickens and turns bright red.
Add pasta, toss well, and coat evenly with the spicy sauce.
Garnish with parsley or basil and serve hot.
💡 Tips
Add extra chili flakes for more heat.
Best served with crusty garlic bread.
2. Pesto Pasta Recipe
🥗 Ingredients
2 cups fusilli or spaghetti
½ cup fresh basil leaves
2 garlic cloves
2 tbsp olive oil
1 tbsp pine nuts or walnuts
2 tbsp Parmesan cheese
Salt & pepper to taste
Pesto Pasta
👩🍳 Method
Cook pasta of your choice until just tender. Reserve ¼ cup pasta water.
In a blender, grind basil, garlic, nuts, olive oil, and Parmesan into a smooth paste.
Heat a pan, add cooked pasta, stir in the pesto, and splash with pasta water.
Season with salt and pepper, mix well, and serve hot.
💡 Tips
Replace basil with coriander or spinach for an Indianised pasta recipe.
For a vegan version, skip cheese or use nutritional yeast.
3. Penne Pasta Recipes – Veggie Delight
🥗 Ingredients
2 cups penne pasta
1 tbsp olive oil
1 onion (sliced)
½ cup capsicum & zucchini
½ cup mushrooms
1 tsp chili flakes & oregano
Salt & pepper to taste
1 tbsp cream or cheese
Penne Pasta
👩🍳 Method
Cook penne pasta in salted water until al dente.
Heat olive oil, sauté onion, capsicum, zucchini, and mushrooms.
Add salt, pepper, chili flakes, and oregano.
Toss in boiled pasta, splash with cream, and mix well.
Serve hot, garnished with parsley.
💡 Tips
You can also add spinach or broccoli.
Works great as a quick dinner or lunchbox recipe.
4. Macaroni Pasta Recipe – Indian Style
🥗 Ingredients
2 cups macaroni pasta
2 tbsp oil
1 onion & 1 tomato (chopped)
½ cup capsicum & peas
1 tsp ginger-garlic paste
½ tsp turmeric powder
½ tsp chili powder
Salt to taste
Grated cheese (optional)
Macaroni Pasta
👩🍳 Method
Boil macaroni in salted water until soft, drain and keep aside.
Heat oil, sauté onions, tomatoes, and ginger-garlic paste.
Add peas, capsicum, turmeric, chili powder, and salt.
Toss in macaroni, mix well, and cook for 2 minutes.
Garnish with cheese and coriander leaves.
💡 Tips
This Indian pasta recipe is perfect for kids’ tiffin.
Add green chilies for a spicier version.
5. Red Sauce Pasta Recipe
If you love tangy and slightly spicy flavors, this red sauce pasta recipe is the perfect choice. Made with ripe tomatoes, garlic, and Italian herbs, it’s a comforting dish you can prepare in under 30 minutes.
🥗 Ingredients
2 cups penne or fusilli pasta
3 tomatoes (blanched & pureed)
1 onion (finely chopped)
4–5 garlic cloves (minced)
2 tbsp olive oil
½ tsp chili flakes & oregano
Salt & pepper to taste
Red Sauce Pasta
👩🍳 Method
Cook pasta until al dente and set aside.
Heat oil, sauté garlic and onion until golden.
Add tomato puree, salt, chili flakes, and oregano. Cook till thick.
Toss in boiled pasta, mix well, and coat with sauce.
Serve hot with Parmesan cheese or fresh basil.
💡 Tip: Add bell peppers or mushrooms for a veggie twist.
6. Pasta Recipe in Hindi
अगर आप कुछ झटपट और स्वादिष्ट बनाना चाहते हैं, तो यह pasta recipe in Hindi आपके लिए परफ़ेक्ट है। भारतीय मसालों के साथ बना यह पास्ता बच्चों और बड़ों दोनों को बहुत पसंद आएगा।
🥗 सामग्री
2 कप पास्ता (मैकरोनी या पेनने)
2 चम्मच तेल
1 प्याज (बारीक कटा हुआ)
1 टमाटर (कटा हुआ)
½ कप शिमला मिर्च और मटर
1 चम्मच अदरक-लहसुन पेस्ट
½ चम्मच हल्दी पाउडर
½ चम्मच लाल मिर्च पाउडर
स्वादानुसार नमक
Pasta
👩🍳 विधि
पास्ता को नमक वाले पानी में उबालकर अलग रखें।
कड़ाही में तेल गरम करें और प्याज, टमाटर और अदरक-लहसुन पेस्ट भूनें।
अब इसमें शिमला मिर्च, मटर, हल्दी, मिर्च पाउडर और नमक डालें।
उबला हुआ पास्ता डालकर अच्छे से मिलाएँ।
धनिया पत्ती या चीज़ डालकर परोसें।
💡 टिप: बच्चों के टिफिन के लिए बेस्ट रेसिपी है।
7. Pink Sauce Pasta Recipe
If you can’t decide between creamy white sauce pasta and tangy red sauce pasta, the pink sauce pasta recipe is your best pick! This beautiful dish combines the richness of cream with the zest of tomato sauce, creating a smooth, flavorful pasta.
🥗 Ingredients
2 cups penne pasta
1 cup tomato puree
1 cup milk
2 tbsp fresh cream
2 tbsp butter
3–4 garlic cloves (chopped)
½ tsp oregano & chili flakes
Salt to taste
Pink Sauce Pasta
👩🍳 Method
Cook pasta in salted water and keep aside.
In a pan, melt butter and sauté garlic.
Add tomato puree, chili flakes, and oregano. Cook until saucy.
Pour in milk and cream, stir continuously to make a smooth pink sauce.
Toss in pasta, mix well, and garnish with parsley or cheese.
💡 Tip: Perfect for date nights or when you want a café-style dish at home.
When it comes to comfort food, a red pasta recipe is a timeless classic. Rich tomato flavors combined with garlic and herbs make this dish a favorite for every pasta lover.
🥗 Ingredients
2 cups fusilli or penne pasta
2 cups tomato puree
1 onion (finely chopped)
4 garlic cloves (minced)
2 tbsp olive oil
½ tsp chili flakes, ½ tsp oregano
Salt & pepper to taste
Red Pasta
👩🍳 Method
Cook pasta al dente and set aside.
Heat olive oil, sauté garlic and onion till golden.
Add tomato puree, chili flakes, oregano, and cook until thick.
Toss pasta into the sauce and mix well.
Garnish with fresh basil or Parmesan cheese.
💡 Tip: Add olives and bell peppers for extra flavor.
9. Chicken Pasta Recipes
For non-veg lovers, chicken pasta recipes bring together juicy chicken chunks and creamy or tangy sauces. This simple one-pot meal is hearty and satisfying.
🥗 Ingredients
2 cups penne pasta
200g boneless chicken (cubed)
1 onion & 3 garlic cloves (chopped)
1 cup tomato puree or white sauce (as preferred)
2 tbsp oil
½ tsp chili flakes, oregano
Salt & pepper
Chicken Pasta
👩🍳 Method
Cook pasta and keep aside.
Heat oil, sauté garlic and onion, then add chicken cubes. Cook till golden.
Stir in tomato puree or cream-based sauce. Season with chili flakes and oregano.
Toss in pasta, coat evenly, and cook for 2–3 minutes.
Garnish with cheese and serve hot.
💡 Tip: Works well with both red sauce and creamy Alfredo.
10. Spaghetti Pasta Recipe
Nothing beats the classic spaghetti pasta recipe – a comforting Italian staple that’s quick, easy, and delicious.
🥗 Ingredients
200g spaghetti
2 tbsp olive oil
4 garlic cloves (sliced)
2 cups tomato puree
½ tsp chili flakes & oregano
Salt to taste
Grated Parmesan cheese
Spaghetti Pasta
👩🍳 Method
Cook spaghetti in salted water until al dente.
Heat olive oil, sauté garlic till fragrant.
Add tomato puree, oregano, chili flakes, and cook for 5–7 minutes.
Toss spaghetti in the sauce until coated.
Top with Parmesan and basil before serving.
💡 Tip: Add sautéed veggies or meatballs for variation.
11. White Sauce Pasta Recipe Italian
Creamy, cheesy, and indulgent – the white sauce pasta recipe Italian style is perfect for special dinners or when you crave a rich treat.
🥗 Ingredients
2 cups penne or fusilli pasta
2 tbsp butter
2 tbsp flour (maida)
2 cups milk
½ cup grated cheese
½ tsp black pepper, oregano
Salt to taste
White Sauce Pasta
👩🍳 Method
Boil pasta in salted water and keep aside.
In a pan, melt butter and whisk in flour. Cook for 1 minute.
Slowly add milk, stirring to avoid lumps. Cook till thick.
Add cheese, salt, pepper, and oregano to make creamy sauce.
Mix in pasta, coat well, and serve warm.
💡 Tip: Add broccoli, corn, or mushrooms for extra Italian flair.
12. Italian Pasta Recipes
When we talk about Italian pasta recipes, we think of authenticity, simplicity, and flavor. The secret lies in fresh ingredients like ripe tomatoes, extra virgin olive oil, and fragrant herbs. One of the most loved Italian classics is Pasta Aglio e Olio.
🥗 Ingredients
200g spaghetti
4 garlic cloves (sliced)
2 tbsp olive oil
½ tsp chili flakes
Fresh parsley
Salt
Italian Pasta
👩🍳 Method
Cook spaghetti in salted water until al dente.
Heat olive oil, sauté garlic till lightly golden.
Add chili flakes, then toss in the pasta.
Season with salt and garnish with parsley.
💡 Tip: Simplicity is key – don’t overdo sauces.
13. Vegetarian Pasta Recipes
For vegetarians, pasta can be made wholesome, colorful, and packed with nutrients. A classic vegetarian pasta recipe combines seasonal veggies with herbs and cheese.
🥗 Ingredients
2 cups penne pasta
1 cup mixed vegetables (broccoli, bell peppers, carrots, zucchini)
2 garlic cloves (chopped)
2 tbsp olive oil
1 cup tomato or white sauce
Oregano, chili flakes, salt
Vegetarian Pasta
👩🍳 Method
Cook pasta and set aside.
Heat olive oil, sauté garlic and vegetables till tender yet crunchy.
Add tomato or white sauce and seasonings.
Toss pasta into the sauce and mix well.
Garnish with grated cheese.
💡 Tip: Add spinach or mushrooms for a hearty boost.
14. Fusilli Pasta Recipe
The spiral shape of fusilli pasta holds onto sauces beautifully, making it perfect for creamy or chunky recipes.
🥗 Ingredients
2 cups fusilli pasta
2 tbsp olive oil
1 onion, 3 garlic cloves
1 cup tomato puree
1 cup sautéed veggies (corn, peppers, zucchini)
Salt, oregano, chili flakes
Fusilli Pasta
👩🍳 Method
Boil fusilli pasta until al dente.
In a pan, heat oil, sauté onion and garlic.
Add tomato puree and seasonings. Cook for 5 minutes.
Toss in veggies and cooked fusilli. Mix well.
Serve with a sprinkle of Parmesan.
💡 Tip: Fusilli is also excellent in cold pasta salads.
15. Indian Pasta Recipe
An Indian pasta recipe blends desi spices with Italian pasta for a spicy, tangy twist – perfect for Indian taste buds.
🥗 Ingredients
2 cups macaroni pasta
1 onion, 1 tomato, 2 green chilies
2 tbsp oil
1 tsp cumin seeds
½ tsp turmeric, ½ tsp red chili powder, ½ tsp garam masala
Coriander leaves
Indian Pasta
👩🍳 Method
Cook macaroni and set aside.
Heat oil, add cumin, onion, and green chilies. Sauté well.
Add chopped tomato and spices. Cook until masala releases oil.
Toss in pasta, coat with masala, and stir fry for 2–3 minutes.
Garnish with coriander leaves.
💡 Tip: Great for lunchboxes and evening snacks.
16. Indianised Pasta Recipes
If you love fusion food, Indianised pasta recipes are for you. They take the best of both worlds – Italian pasta with Indian spices. A popular version is Paneer Masala Pasta.
🥗 Ingredients
2 cups penne pasta
1 cup paneer cubes
1 onion, 1 tomato (chopped)
2 tbsp oil
½ tsp turmeric, ½ tsp chili powder, ½ tsp garam masala
Fresh cream (optional)
Indianised Pasta
👩🍳 Method
Cook pasta and keep aside.
In oil, sauté onion, tomato, and spices to make a masala.
Add paneer cubes and cook for 3–4 minutes.
Toss pasta into the paneer masala and mix well.
Garnish with coriander or grated cheese.
💡 Tip: You can add capsicum or peas for extra Indian flavors.
17. Pesto Pasta Recipe
A true Italian classic, pesto pasta recipe is loved for its herby, nutty, and cheesy flavor. The sauce is made with fresh basil, garlic, pine nuts, Parmesan, and olive oil.
🥗 Ingredients
2 cups spaghetti or penne
1 cup fresh basil leaves
2 tbsp pine nuts (or walnuts)
3 garlic cloves
¼ cup Parmesan cheese
3 tbsp olive oil
Salt, pepper
Pesto Pasta
👩🍳 Method
Blend basil, garlic, nuts, cheese, and olive oil into a smooth pesto.
Cook pasta in salted water.
Toss the hot pasta with pesto sauce until evenly coated.
Adjust seasoning and serve fresh.
💡 Tip: Add grilled chicken or mushrooms for a hearty twist.
18. Penne Pasta Recipes
Among all pasta shapes, penne pasta recipes are the most versatile. Their tube-like structure makes them perfect for creamy or chunky sauces. Here’s a quick creamy penne recipe.
🥗 Ingredients
2 cups penne pasta
1 tbsp butter
2 garlic cloves
1 cup cream or milk
½ cup grated cheese
Salt, oregano, chili flakes
Penne Pasta
👩🍳 Method
Boil penne pasta and drain.
In a pan, melt butter and sauté garlic.
Add cream/milk and bring to a gentle boil.
Mix in cheese, salt, and seasonings.
Toss penne pasta and cook for 2 minutes.
💡 Tip: Add spinach, broccoli, or mushrooms for extra flavor.
Comforting and homely, macaroni pasta recipe is a favorite among kids and adults. It can be made in both Indian masala and Italian cheesy style.
🥗 Ingredients
2 cups elbow macaroni
1 onion, 1 tomato, ½ cup mixed veggies
2 tbsp butter
1 cup tomato sauce
Salt, black pepper, oregano
Macaroni Pasta
👩🍳 Method
Cook macaroni pasta until al dente.
Heat butter in a pan, sauté onions and veggies.
Add tomato sauce and seasonings.
Toss macaroni into the sauce and cook for 3 minutes.
Serve hot with grated cheese.
💡 Tip: For Indian style, add turmeric, green chilies, and garam masala.
20. White Sauce Pasta Recipe Italian Style
One of the most loved Italian pasta recipes, the white sauce pasta recipe is creamy, cheesy, and indulgent. This dish is perfect for both kids and adults who enjoy rich flavors with a hint of garlic and herbs.
🥗 Ingredients
2 cups penne or fusilli pasta
2 tbsp butter
2 tbsp all-purpose flour
2 cups milk
½ cup grated cheese (mozzarella/Parmesan)
2 garlic cloves (minced)
Salt, black pepper, oregano, chili flakes
White Sauce Pasta
👩🍳 Method
Cook pasta until al dente.
In a pan, melt butter, add garlic, and stir in flour.
Slowly add milk, whisking to make a smooth sauce.
Mix in cheese, salt, and pepper.
Toss pasta into the sauce, sprinkle oregano & chili flakes, and serve hot.
💡 Tip: Add sautéed veggies or grilled chicken for a wholesome twist.
Doodh Cola Recipe – A Refreshing Fusion of Milk and Cola
When it comes to unique Indian beverages, Doodh Cola (also called milk cola recipe or doodh soda recipe) holds a special place in the hearts of many. Imagine the creaminess of chilled milk meeting the fizzy punch of cola—it may sound unusual at first, but once you try it, this fusion becomes an unforgettable treat. Whether you are searching for a doodh cola drink recipe, a nostalgic doodh soda Punjab drink, or even the famous doodh cola Kolkata special, this guide will take you through everything you need to know.
The Story Behind Doodh Cola
The origin of doodh cola can be traced to North India, especially in Punjab, where it is fondly known as doodh soda drink recipe. During hot summers, people often mix milk with fizzy soda to create a refreshing thirst quencher. Over time, cola was introduced into the mix, giving rise to the modern version we know today as milk cola drink.
Street vendors across Kolkata, Punjab, and Delhi sell this unique non-alcoholic doodh cola as a refreshing cooler, especially during festivals and scorching summer days. It has become so popular that people now search online for terms like doodh cola recipe video, doodh cola how to, and doodh cola step by step to recreate this drink at home.
Why Try Doodh Cola?
At first glance, combining cola with milk sounds strange. But once you sip this chilled concoction, you’ll understand why it has such a following. Here are a few reasons why people love this cool doodh cola drink:
Unique Flavor Combination – The fizz from cola cuts through the creaminess of milk, making it light yet rich.
Quick & Easy – With just two main ingredients, the doodh cola recipe takes less than 5 minutes.
Customizable – You can make different doodh cola variations like adding ice cream, vanilla essence, or spices.
Nostalgic & Cultural – For many Indians, this drink brings back childhood memories of sipping a doodh soda Punjab drink from a local shop.
Refreshing & Energizing – Cola gives the fizz, and milk provides nutrition, making it more wholesome than plain aerated drinks.
Doodh Cola Recipe – Step by Step
If you’ve ever wondered how to make doodh cola at home, here’s the complete method.
Ingredients for Doodh Cola
1 glass of chilled milk (full cream preferred)
1 glass of chilled cola (Coca-Cola, Pepsi, or any preferred brand)
Ice cubes – optional
Sugar – optional (since cola is already sweet)
A pinch of cardamom powder (optional, for a doodh soda Kolkata special twist)
Instructions (Doodh Cola Step by Step)
Chill the Ingredients
For the perfect doodh cola drink recipe, always use chilled milk and cola. Warm milk will curdle when mixed with soda, so refrigerate beforehand.
Prepare the Glass
Take a tall glass. Add a few ice cubes if you want your milk cola drink extra chilled.
Mix Cola & Milk
Pour half a glass of cola. Slowly add chilled milk over it. (Always add milk to cola, not the other way around, to avoid excess froth).
Stir Gently
Use a spoon to stir lightly. The fizz will rise, giving your doodh cola Kolkata special its iconic bubbly texture.
Add Variations if Desired
Sprinkle some cardamom powder for aroma, or add a scoop of vanilla ice cream for a doodh cola variation.
Serve Immediately
Garnish with a straw and enjoy your refreshing non-alcoholic doodh cola drink!
Tips for the Perfect Doodh Cola
Always use chilled milk to prevent curdling.
Adjust the ratio: Some prefer equal parts milk and cola, while others like more cola for fizz or more milk for creaminess.
For an authentic doodh soda recipe Punjab style, add a dash of rose syrup.
If you like experimenting, try different doodh cola variations with flavored colas or soda water.
While it may not be the healthiest drink, doodh cola calories are a balance of milk’s nutrition and cola’s sugar.
1 glass doodh cola calories (approx):
Milk (100 ml full cream) – 60 calories
Cola (100 ml) – 40 calories
Total – ~100 calories per glass
This makes it a moderate indulgence compared to other sugary beverages.
Doodh Cola Variations
The beauty of this drink lies in its adaptability. Here are some popular doodh cola variations you can try:
Classic Doodh Soda – Replace cola with soda water for a traditional doodh soda drink recipe.
Kolkata Special – Add cardamom and rose syrup to make a fragrant doodh cola Kolkata special.
Ice Cream Float – Top your milk cola drink with a scoop of vanilla ice cream for a creamy twist.
Chocolate Doodh Cola – Mix a spoon of chocolate syrup before adding cola for a dessert-style doodh cola variation.
Spiced Doodh Cola – Add a pinch of cinnamon or nutmeg for a festive version.
Cultural Popularity of Doodh Cola
In Punjab, doodh soda recipe is a common street-side cooler, especially during weddings and hot summers.
In Kolkata, doodh cola Kolkata special is sold in tall glasses with frothy tops, often garnished with dry fruits.
Across India, this drink is becoming a quirky addition to restaurant menus under the name milk soda recipe or milk and cola drink.
FAQs About Doodh Cola
Q1: Is Doodh Cola safe to drink? Yes! As long as both milk and cola are chilled, it’s safe and delicious.
Q2: Does mixing milk and cola curdle? If warm milk is used, yes. But chilled milk prevents curdling, giving you the perfect cool doodh cola drink.
Q3: Can I make a healthy version? Yes. Use skimmed milk and diet cola to reduce doodh cola calories.
Q4: Is Doodh Cola suitable for kids? Yes, in moderation. It’s better than plain soda because of the nutrition from milk.
Q5: Can I store Doodh Cola? No. It must be served immediately; otherwise, the fizz will disappear.
Interesting Facts
The Doodh Cola Recipe is proof that sometimes the strangest combinations create the most delightful results. From the doodh soda Punjab drink to the doodh cola Kolkata special, this beverage has traveled across India, winning hearts with its unique taste. Whether you’re looking for a milk cola drink, a non-alcoholic doodh cola, or just curious about this fusion, this drink is worth a try.
So next time you crave something refreshing and fun, skip the regular soda and prepare this quick doodh cola step by step recipe at home. With its creamy, fizzy, and refreshing taste, it will surely become your favorite summer cooler!
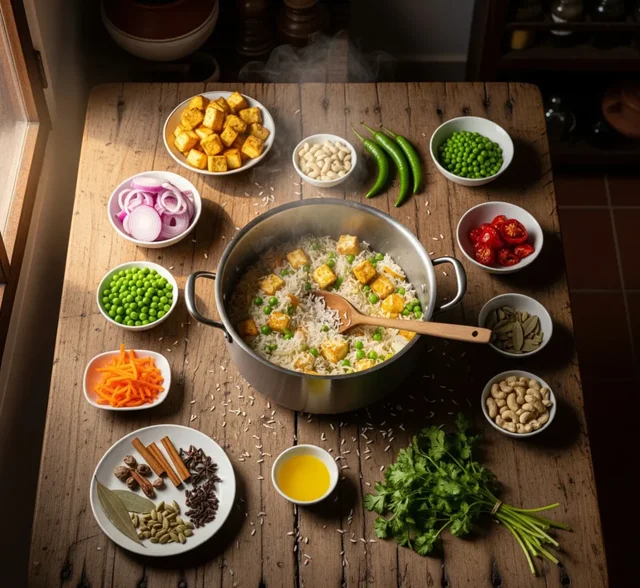
Paneer Pulao Recipe – A Flavorful One-Pot Indian Delicacy
When it comes to quick yet wholesome meals, Paneer Pulao Recipe always wins hearts. Imagine the aroma of basmati rice cooking with fragrant spices, soft cubes of paneer (Indian cottage cheese), and fresh vegetables – all in one pot. Whether you’re looking for an easy paneer pulao recipe for a weekday dinner, a restaurant style paneer pulao for guests, or a healthy paneer pulao recipe for kids’ tiffin, this dish fits every occasion.
In Indian households, pulao is more than food – it’s comfort in a bowl. Adding paneer makes it even more nutritious and filling. This one pot paneer pulao is not just a quick meal but also a paneer rice recipe that pairs beautifully with raita, salad, or curry.
we’ll cover everything about how to make paneer pulao, variations like paneer matar pulao or paneer pulao with vegetables, tips for a fluffy paneer pulao, serving ideas, paneer pulao nutrition, and FAQs.
Why You’ll Love Paneer Pulao
It’s a quick paneer pulao – ready in under 30 minutes.
Perfect for lunch box, dinner, or festive meals.
A healthy paneer pulao recipe loaded with protein-rich paneer and seasonal veggies.
Can be made in pressure cooker, instant pot, or on stovetop.
Works as a complete vegetarian paneer pulao one pot meal.
Ingredients for Paneer Pulao
Here are the basic paneer pulao ingredients you need:
Basmati rice – 1 cup (soaked for 20 minutes for fluffy texture)
Paneer (cottage cheese) – 200g (cut into cubes)
Peas – ½ cup (fresh or frozen, for paneer matar pulao)
Mixed vegetables – carrots, beans, capsicum (optional for paneer pulao with vegetables)
Onion – 1 large (sliced)
Tomato – 1 medium (chopped)
Green chilies – 2 (slit)
Ginger-garlic paste – 1 tsp
Whole spices – bay leaf, cinnamon, cloves, cardamom
Cumin seeds – 1 tsp
Turmeric powder – ½ tsp
Red chili powder – 1 tsp
Coriander powder – 1 tsp
Salt – to taste
Oil or ghee – 2 tbsp
Water – 2 cups
Fresh mint & coriander leaves – for garnish
👉 Tip: For restaurant style paneer pulao, lightly fry paneer cubes until golden before adding.
Ingredients for Paneer Pulao
How to Make Paneer Pulao – Step by Step
This paneer pulao step by step method ensures you get soft rice grains and perfectly flavored paneer.
Step 1: Prep Work
Wash and soak basmati rice for 20 minutes, then drain.
Cut paneer into cubes. For extra flavor, shallow fry until golden.
Chop vegetables and keep spices ready.
Step 2: Tempering the Spices
Heat oil or ghee in a pressure cooker or instant pot.
Add cumin seeds, bay leaf, cardamom, cinnamon, and cloves. Let them splutter.
Step 3: Sauteing the Base
Add sliced onions and sauté until golden brown.
Add ginger-garlic paste and green chilies.
Add chopped tomato and cook until soft.
Step 4: Adding Veggies & Paneer
Add peas, carrots, beans, or capsicum for paneer pulao with vegetables.
Stir in fried paneer cubes.
Step 5: Spices & Rice
Add turmeric, red chili powder, coriander powder, and salt.
Add soaked rice and gently mix.
Step 6: Cooking the Pulao
Add 2 cups water (for 1 cup rice).
Cover and cook:
Pressure cooker – 1 whistle on medium flame.
Instant pot paneer pulao – 5 minutes on “Pressure Cook” mode.
Stovetop pan – cook covered until rice is fluffy.
How to Make Paneer Pulao
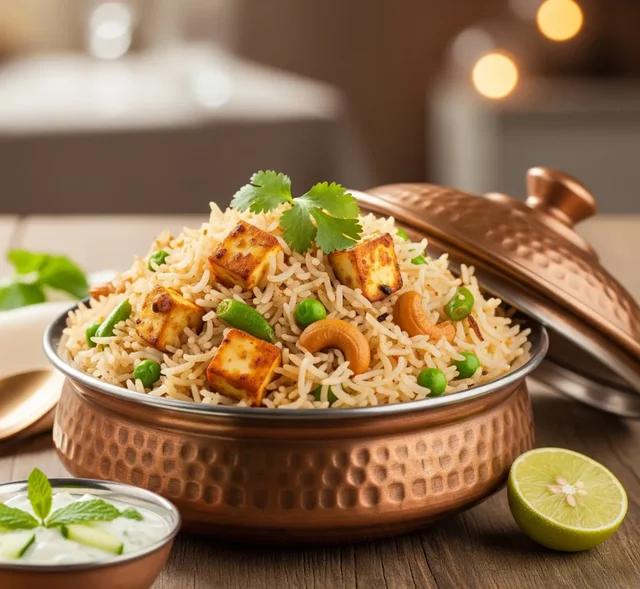
Step 7: Garnishing
Fluff rice gently with a fork.
Garnish with fresh coriander and mint leaves.
Your fluffy paneer pulao is ready! Serve hot with raita or salad.
fluffy paneer pulao
Variations of Paneer Pulao Recipe
Paneer Matar Pulao – Add extra peas for a classic combo.
Paneer Pulao with Vegetables – Mix carrots, beans, capsicum for a nutritious twist.
Restaurant Style Paneer Pulao – Use ghee, whole spices, and fried paneer.
Healthy Paneer Pulao Recipe – Use brown rice or quinoa instead of basmati rice.
Paneer Pulao for Party – Garnish with fried cashews, raisins, and saffron strands.
Paneer Pulao North Indian Style – Add garam masala and fresh cream for richness.
One Pot Paneer Pulao – Perfect for busy days, cook everything in a single pressure cooker/instant pot.
Serving Suggestions
Paneer Pulao is versatile and pairs well with:
Raita – boondi raita, cucumber raita, or mint raita.
Curry – paneer butter masala, dal tadka, or rajma.
Salad – onion cucumber salad with lemon.
Papad & pickle – to complete the Indian thali.
For parties, serve paneer pulao with mint chutney and salad.
Chef Tips for Perfect Paneer Pulao
Always soak basmati rice before cooking to make it fluffy.
Fry paneer lightly to avoid breaking while cooking.
Use ghee instead of oil for authentic flavor.
Don’t over-stir after adding rice; this prevents mushiness.
Add a handful of mint leaves for freshness.
For quick paneer pulao, use frozen peas and pre-cut paneer.
This makes it a balanced paneer pulao healthy diet meal.
FAQs about Paneer Pulao Recipe
1. Can I make paneer pulao without vegetables?
Yes! A simple paneer rice recipe with just paneer, rice, and spices tastes amazing.
2. Can I make paneer pulao without frying paneer?
Absolutely. Add raw paneer directly, but frying gives better texture.
3. Which rice is best for paneer pulao?
Basmati rice is preferred for fluffy paneer pulao, but you can also use sona masoori or brown rice.
4. Can I cook paneer pulao in an Instant Pot?
Yes, follow the same recipe and cook on Pressure Cook mode for 5 minutes.
5. Is paneer pulao good for kids’ lunch box?
Yes, it’s a healthy paneer pulao recipe high in protein and loved by kids.
6. Can I make paneer pulao without onion and garlic?
Yes, for fasting or satvik meals, skip onion and garlic, and add ginger, green chili, and whole spices.
7. Can I add dry fruits to paneer pulao?
Yes! Cashews and raisins make it a paneer pulao for party version.
Interesting Facts
Paneer Pulao Recipe is a timeless Indian dish that brings together paneer, rice, peas, and aromatic spices into a wholesome one-pot meal. Whether you want a quick paneer pulao for lunch box, a restaurant style paneer pulao for guests, or a healthy paneer pulao recipe for everyday meals, this dish will never disappoint.
It’s versatile, delicious, and full of flavors. So next time you’re craving comfort food, skip the takeout and try this easy paneer pulao recipe at home.
Sama Rice Pulao Recipe | How to Make Sama ke Chawal Pulao for Vrat
When it comes to vrat (fasting) recipes, Sama Rice Pulao Recipe—also known as Sama ke Chawal Pulao or Barnyard Millet Pulao—holds a special place in Indian kitchens. This wholesome dish, prepared with samvat rice or barnyard millet, is light, gluten-free, and easily digestible, making it perfect for festivals like Navratri, Shivratri, Janmashtami, or Ekadashi.
Unlike regular rice, sama ke chawal (barnyard millet) cooks quickly, provides lasting energy, and is considered auspicious during fasting. In this blog, we’ll explore how to make Sama Rice Pulao step by step, its health benefits, variations like sama rice pulao with potatoes and nuts, and pro-chef tips to achieve the perfect taste.
Whether you’re looking for a quick sama rice pulao, an instant pot sama rice pulao, or a traditional sama pulao during fasting, this recipe guide has everything you need.
What is Sama Rice?
Sama rice, also called samvat rice, vrat ke chawal, or barnyard millet, is not actual rice but a gluten-free millet. Its light texture and nutty flavor make it a popular grain substitute during Hindu fasts. Rich in protein, iron, and fiber, sama rice pulao is not just a vrat recipe but also a healthy sama rice pulao option for everyday meals.
Why Choose Sama Rice Pulao During Fasting?
Easily digestible – Sama ke chawal is light on the stomach.
Energy boosting – Perfect for long fasting days.
Gluten-free – Great for people with gluten intolerance.
Nutritious – Rich in fiber, protein, and minerals.
Versatile – Can be used in sama rice khichdi pulao, sama rice kheer, and more.
Ingredients for Sama Rice Pulao Recipe
To make a delicious Sama ke Chawal Pulao, you need simple, vrat-friendly ingredients:
1 cup sama ke chawal (barnyard millet / samvat rice)
2 medium potatoes (peeled & cubed)
1 green chili (finely chopped)
1 tsp cumin seeds (jeera)
8–10 cashews or peanuts (for crunch)
1 tbsp ghee (clarified butter) or oil
2 cups water
Rock salt (sendha namak, used in fasting) – to taste
Fresh coriander leaves – chopped for garnish
Optional: 1 small carrot or peas (if not fasting, for extra nutrition)
Ingredients for Sama Rice Pulao Recipe
Step by Step – How to Make Sama Rice Pulao
Here’s the sama rice pulao step by step guide:
Step 1: Wash and Soak Sama Rice
Wash 1 cup sama ke chawal thoroughly.
Soak in water for 15 minutes to soften and reduce cooking time.
Step 2: Heat Ghee
In a pan or pressure cooker, heat 1 tbsp ghee.
Add 1 tsp cumin seeds and let them crackle.
Step 3: Add Potatoes & Nuts
Add cubed potatoes and sauté until golden.
Add cashews or peanuts and fry till light brown.
Step 4: Add Green Chili
Stir in chopped green chili for a mild spicy flavor.
Step 5: Add Sama Rice
Drain soaked sama rice and add to the pan.
Stir well so it gets coated with ghee and spices.
Step 6: Add Water & Cook
Add 2 cups water and rock salt to taste.
Mix gently and cover with a lid.
Cook on medium flame until water is absorbed.
How to Make Sama Rice Pulao
Step 7: Garnish & Serve
Once cooked, fluff with a fork.
Garnish with fresh coriander leaves.
Your delicious Sama Rice Pulao is ready!
Sama Rice Pulao
Sama Rice Pulao Variations
Sama Rice Pulao with Potatoes & Nuts – Add fried potatoes, cashews, or almonds for a rich, vrat-friendly version.
Navratri Sama Rice Pulao – Keep it simple with just cumin, green chili, and rock salt.
Healthy Sama Rice Pulao with Vegetables – Add carrots, beans, or peas for a more nutritious meal (outside fasting).
Instant Pot Sama Rice Pulao – Cook soaked sama rice with potatoes and water on pressure cook mode (5 minutes).
One Pot Sama Rice Pulao – Make it in a single cooker or pan for convenience.
Sama Rice Khichdi Pulao – Add extra water and cook softer for a khichdi-style dish.
Diabetic friendly – Low glycemic index controls sugar levels.
Heart healthy – Rich in magnesium and fiber.
Gluten-free – Safe for people with gluten intolerance.
Energy booster – Ideal for fasting and daily meals.
Frequently Asked Questions (FAQs)
1. What is Sama Rice?
Sama rice, also called barnyard millet or vrat ke chawal, is a millet used during fasting.
2. Can I make Sama Rice Pulao without potatoes?
Yes, simply skip potatoes or replace them with sweet potatoes.
3. How is Sama Rice Pulao different from Sama Khichdi?
The pulao is fluffy and grain-separated, while khichdi is softer with more water.
4. Can I cook Sama Rice Pulao without soaking?
Soaking helps in faster and even cooking. It’s recommended but not compulsory.
5. Is Sama Rice Pulao good for weight loss?
Yes, it’s light, low in calories, and keeps you full for longer.
6. Can I store Sama Rice Pulao?
Yes, you can refrigerate it for up to 24 hours. Reheat with a sprinkle of water before serving.
Interesting facts
Sama Rice Pulao Recipe is more than just a fasting dish—it’s a healthy, gluten-free, one pot meal that can be enjoyed by anyone. Whether you prepare it as a Navratri sama rice pulao, a quick sama rice pulao for lunch, or a sama rice khichdi pulao for comfort food, it’s nourishing, delicious, and satisfying.
Now that you know how to make Sama ke Chawal Pulao step by step, try this recipe at home and enjoy it with yogurt or chutney. This wholesome barnyard millet pulao will surely become a favorite, not only for vrat but for everyday meals.